Why Smart Photographers Always Check the Weather Before a Shoot
Photography is about chasing the moment, light cutting through mist, a smile caught just before it fades, the first break of dawn across a quiet landscape. But for all our skill, instinct, and creativity, there's one thing we can't control: the weather.
And yet, we can prepare for it.
Whether I’m out capturing landscapes, shooting portraits in natural light, or covering outdoor events, checking the weather has become second nature. Over time, I’ve learned that the difference between a successful shoot and a frustrating one often comes down to how well I’ve read the sky and planned accordingly.
Here's why weather awareness is a game-changer for photographers and how the right tools and habits help me make the most of any conditions.
1. Use the Right Tools: Your Weather Toolkit
Smart preparation starts with smart tools. I rely on a handful of apps and data sources that, together, paint a complete picture of the elements:
📱 Clear Outside – For light quality and cloud cover forecasts
📱 Windy – To track wind, rain, and approaching weather systems
📱 OS Maps (UK) – Essential for terrain, elevation, and route planning
🌊 Tide Data – Critical for coastal access, timing, and composition
Each app reveals something different. Together, they allow me to plan with confidence from what to pack, to when to shoot, to whether I should even leave the house.
2. Clear Outside: Predict the Light Before You Pack
Light is everything in photography, and Clear Outside is my go-to app for understanding how clouds might influence it. It gives an hour-by-hour breakdown of cloud cover, sorted by altitude and type.
☁️ High clouds tend to produce soft, flattering, diffused light, perfect for portraits and golden hour landscapes.
🌫️ Low clouds or fog can add depth, drama, and mood, especially in woodland or coastal scenes.
Knowing the light forecast helps me choose the right gear, ND filters or not? Drone or handheld? Tripod or shoulder strap? and plan my timing and creative approach before I even leave the door.
3. Windy: Know What’s Blowing Your Way
Windy is a visual, dynamic weather tool that shows how systems are moving in real-time. For outdoor photographers, especially those who rely on long exposures, drones, or remote locations, it’s invaluable.
When I see a storm front coming in, I can prepare accordingly:
✔️ Weather-sealed camera gear
✔️ Waterproof clothing for myself and my pack
✔️ Extra microfiber cloths to keep lenses clear
Strong wind? Maybe I’ll skip the drone flight. Heavy rain? Time for creative indoor shots or some dramatic storm photography. Windy lets me adapt fast and stay dry.
4. Dress Like It Matters—Because It Does
Being wet, cold, or overheated doesn’t just make a shoot miserable it kills focus and creativity. The wrong clothing has cut more sessions short than any technical error.
Here’s my tried-and-true clothing approach:
🧥 Layered waterproofs – Breathable outer shells that keep rain out and sweat from building up
🧤 Gloves and hats – Especially for those early starts and windy cliff tops
☀️ Lightweight, moisture-wicking clothing – For summer hikes or mid-day shoots
When I’m comfortable, I shoot better. It’s that simple.
5. OS Maps: Navigate with Confidence
Many of my favourite photo spots are miles from paved roads or mobile signal. That's why OS Maps is an essential part of my prep.
Before every remote shoot, I:
🗺️ Plot and download the route
⛰️ Check terrain and elevation changes
🕐 Estimate arrival for the best light
Good navigation means no surprises. I know when I’ll hit that mountain ridge, where to detour if the trail floods, and how to time the light perfectly.
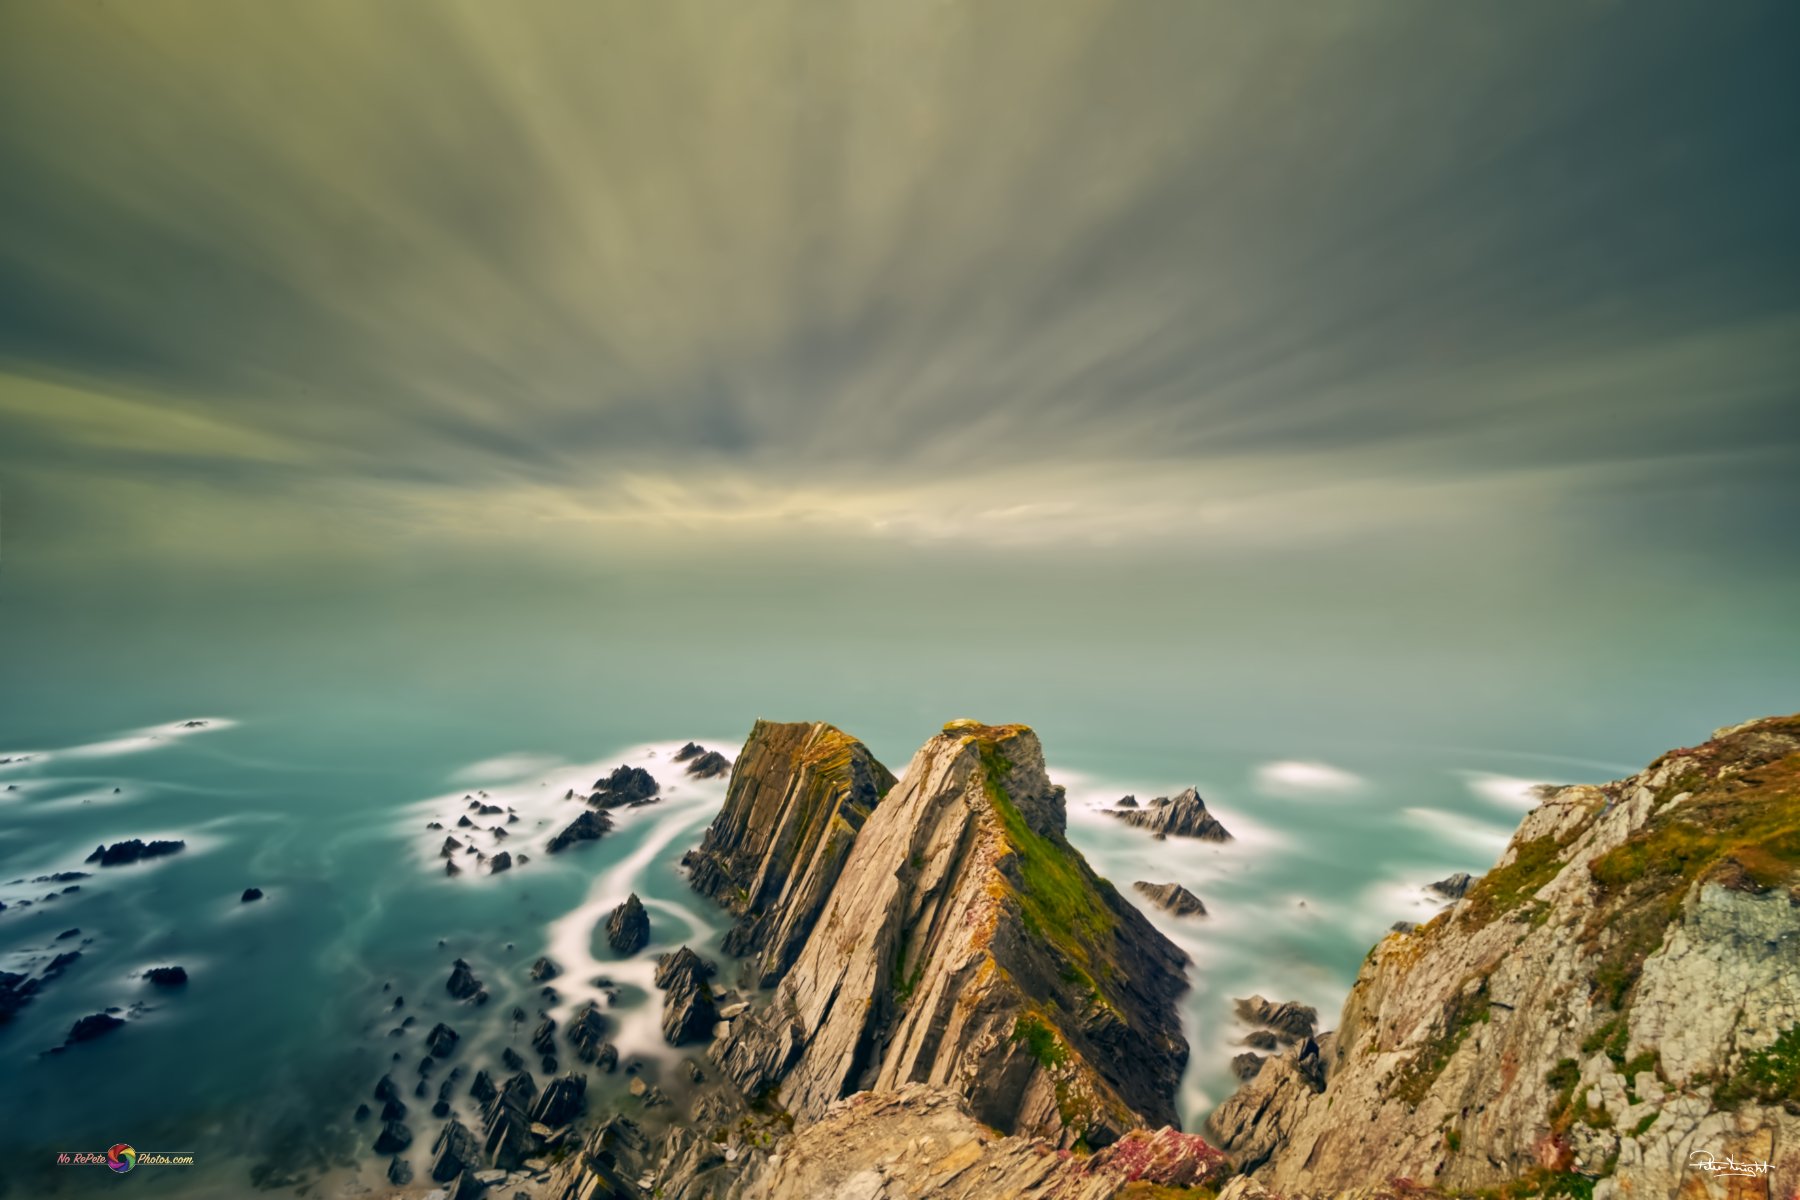
6. Tides: Coastal Shoots Require Perfect Timing
The coast is one of the most dynamic shooting environments. Tides don’t just shape the landscape they transform it. That rock pool or reflective surface you saw on Instagram? It might be buried or gone altogether when you arrive.
By checking tide data, I can plan for:
✅ Safe access (especially on beaches or rocky paths that disappear at high tide)
✅ Exposed elements like rocks, pools, or seaweed beds that add visual texture
✅ Reflections and symmetrical compositions that only appear at low tide
Ignoring tide timing can cost you the shot or worse, your safety.
The Bigger Picture: Why Preparation Fuels Creativity
Some of the best compliments I’ve received about my work reference the feeling of spontaneity in the images the authenticity, the magic of the moment. But most of those moments didn’t happen by chance.
They were created by preparation.
I knew the clouds would roll in at 7:45 AM. I knew the trail would be slippery and the tide would be rising. I dressed for the conditions. I arrived with the right lens, the right light, and the right mindset. And when the moment came, I was ready to capture it not fighting my environment.
Final Thought: Mastering the Forecast
Photography isn’t just about reacting it’s about anticipating. The better we understand the world we’re stepping into, the more creative we can be inside it.
So, before your next shoot, take 10 minutes to prep:
✅ Check the cloud forecast
✅ Track incoming systems
✅ Plan your route
✅ Dress for the elements
✅ Know the tides
Because sometimes the best shot doesn’t start with the shutter it starts with a weather check.
📸No RePete Photos – Shoot smarter. Plan sharper. Create freely.